Components
1 x Raspberry Pi Pico
1 x Breadboard (16.5 x 5.5cm 830 holes)
1 x I2C Module for LCD1602 Character LCD
1 x LCD1602 Character LCD
1 x Finger adjust 1K ohm variable resistor (single turn preset)
6 x male to female jumper wire
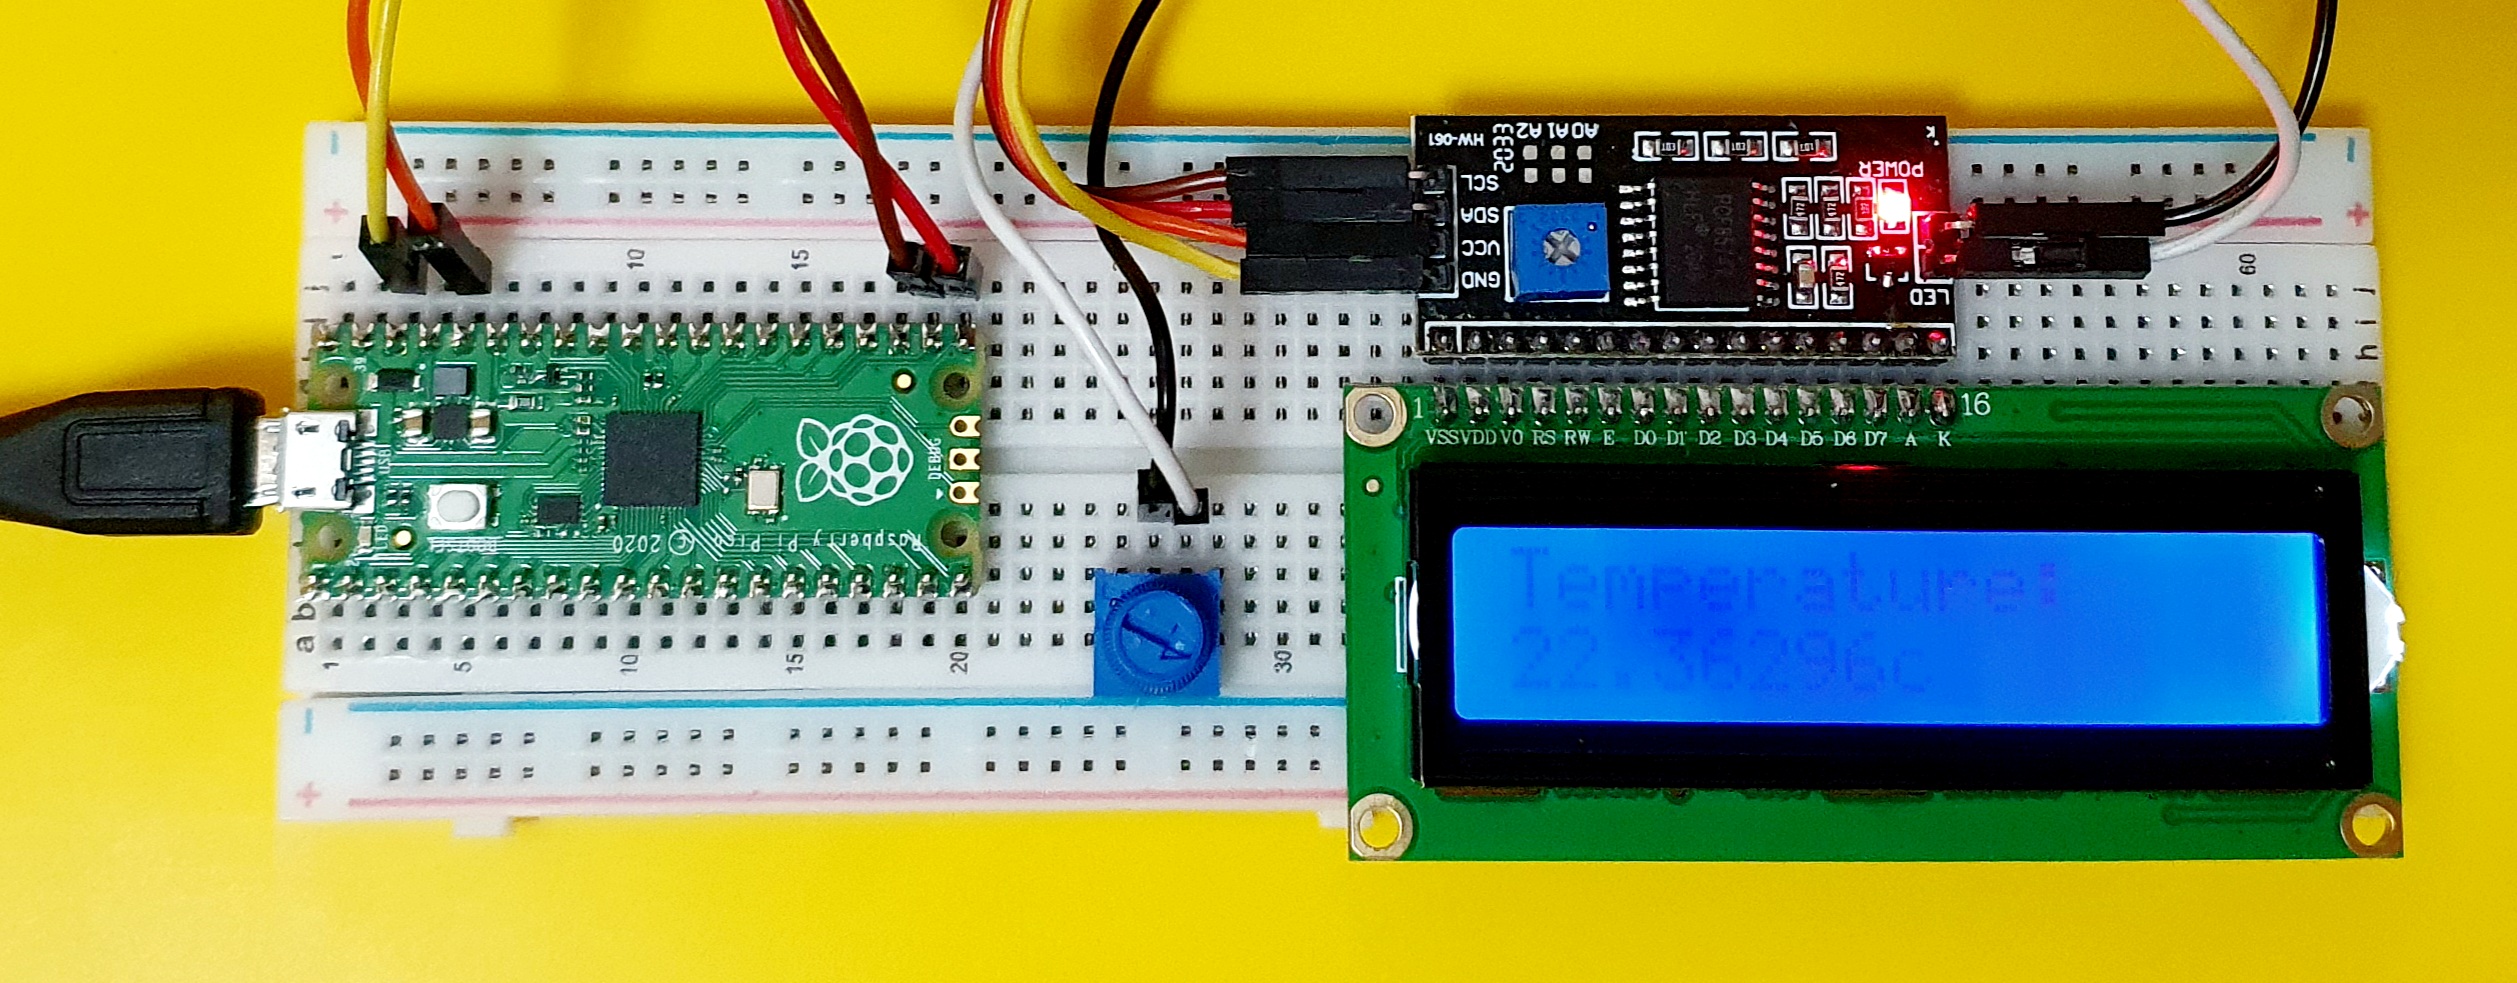
Wiring
| Pico | i2c module | Resistor | Wire Colour |
|---|---|---|---|
| 38 GND | GND | Yellow | |
| 36 3v3 | VSS | Orange | |
| 22 GP17 I2C0SCL | SCL | Brown | |
| 21 GP16 I2C0SDA | SDA | Red | |
| Left Pin | Right pin | White | |
| Right Pin | Centre pin | Black |

Description & Code
This is a simple Raspberry Pi Pico project to take a reading from the Pico’s on-board temperature sensor (see section 3.3 of the Pico manual) and display it on an LCD display.
The LCD I am using is a standard 16x2 1602 LCD display. Mine did not have a built-in i2c backpack, so I am using a separate i2c module for character LCD displays. If you can, I highly recommend using i2c rather than GPIO for this project as it simplifies the wiring and code significantly.
I have chosen to use a variable resistor (the blue finger dial on the breadboard) which allows me to vary the current going across the i2c module backlight display jumper. Normally this jumper is either open or closed (on or off), but I found that if I added a 1k resistor between the pins I can vary the current and therefore vary the brightness of the LCD display backlight.
The code below is written in MicroPython. To drive the LCD, I am using Dave Hyland’s python_lcd module. Git clone the python_lcd module to your local machine.
Assuming you already have the Pico set up with your development system (I have written a basic HOWTO for Arch Linux here), copy the lcd_api.py and esp8266_i2c_lcd.py files from the python_lcd module’s /lcd directory over to the Pico itself. One way to do this is to open the files in Thonny and select save a copy from the File menu, selecting Raspberry Pi Pico as the destination. Once copied to the Pico, you are now able to import these MicroPython modules in your running code.
from time import sleep_ms
from machine import I2C, Pin, ADC
from esp8266_i2c_lcd import I2cLcd

DEFAULT_I2C_ADDR = 0x27
CONV_FACTOR = 3.3 / (65535)

sensor_temp = ADC(4)

i2c = I2C(0, scl=Pin(17), sda=Pin(16), freq=200000)
lcd = I2cLcd(i2c, DEFAULT_I2C_ADDR, 2, 16)

lcd.display_on()
lcd.backlight_on()

while True:
    lcd.clear()
    reading = sensor_temp.read_u16() * CONV_FACTOR
    temperature = 27 - (reading - 0.706)/0.001721

    lcd.putstr("Temperature:\n")
    lcd.putstr(str(temperature))
    lcd.putstr("c")
    sleep_ms(2000)
Some notes on the Python code.
- In my solution, the LCD display was at the default address of 0x27. You may possibly need to change this.
- The Pico pins I chose (21 and 22) correspond to I2C channel 0 (zero), and are named GP16 and GP17, hence the Pin values of 16 for SDA and 17 for SCL in the code.
- The temperature conversion code is taken from the Pico SDK documentation example.
Done!